Following my last thread, “Weak Flour Revisited” and trying Solano’s method of Coil-Folds to overcome the problem, I was left with a soft, over-proofed dough that couldn’t be shaped nor scored but I did managed to shovel the cow-pie into the oven.
In the resulting loaf, I saw the beginnings of an airy crumb (hydration 65%), so I was reluctant to reduce water. I first wanted to address the problem of over-proofing so my original recipe remains the same, except for Rob’s suggestion to use cold water. I even chilled the flour.
RECIPE: 320-gm of cold flour, 210-gm refrigerated water, 1-tsp sea salt, 1/4-tsp yeast— but I have drastically reduced fermentation times: mix dough for 4-min (instead of 5), and let hydrate for 10-min (instead of15). A 15-min rest (instead of 20), following the Bowl-Folds. A 15-min rest (instead of 20), between the four Coil-Fold sessions. Then straight into the fridge for 24-hrs (no 1-hour bulk fermentation at room temperature).
RESULT: The cold “flour and water mix” produced a much stiffer dough. The cold dough was harder to handle during the Bowl-Folds, tearing after stretching 3-inches. The dough was still cold and stiff during the first Coil-Fold session and not “stretchy” but by jiggling the dough, I got it to elongate.
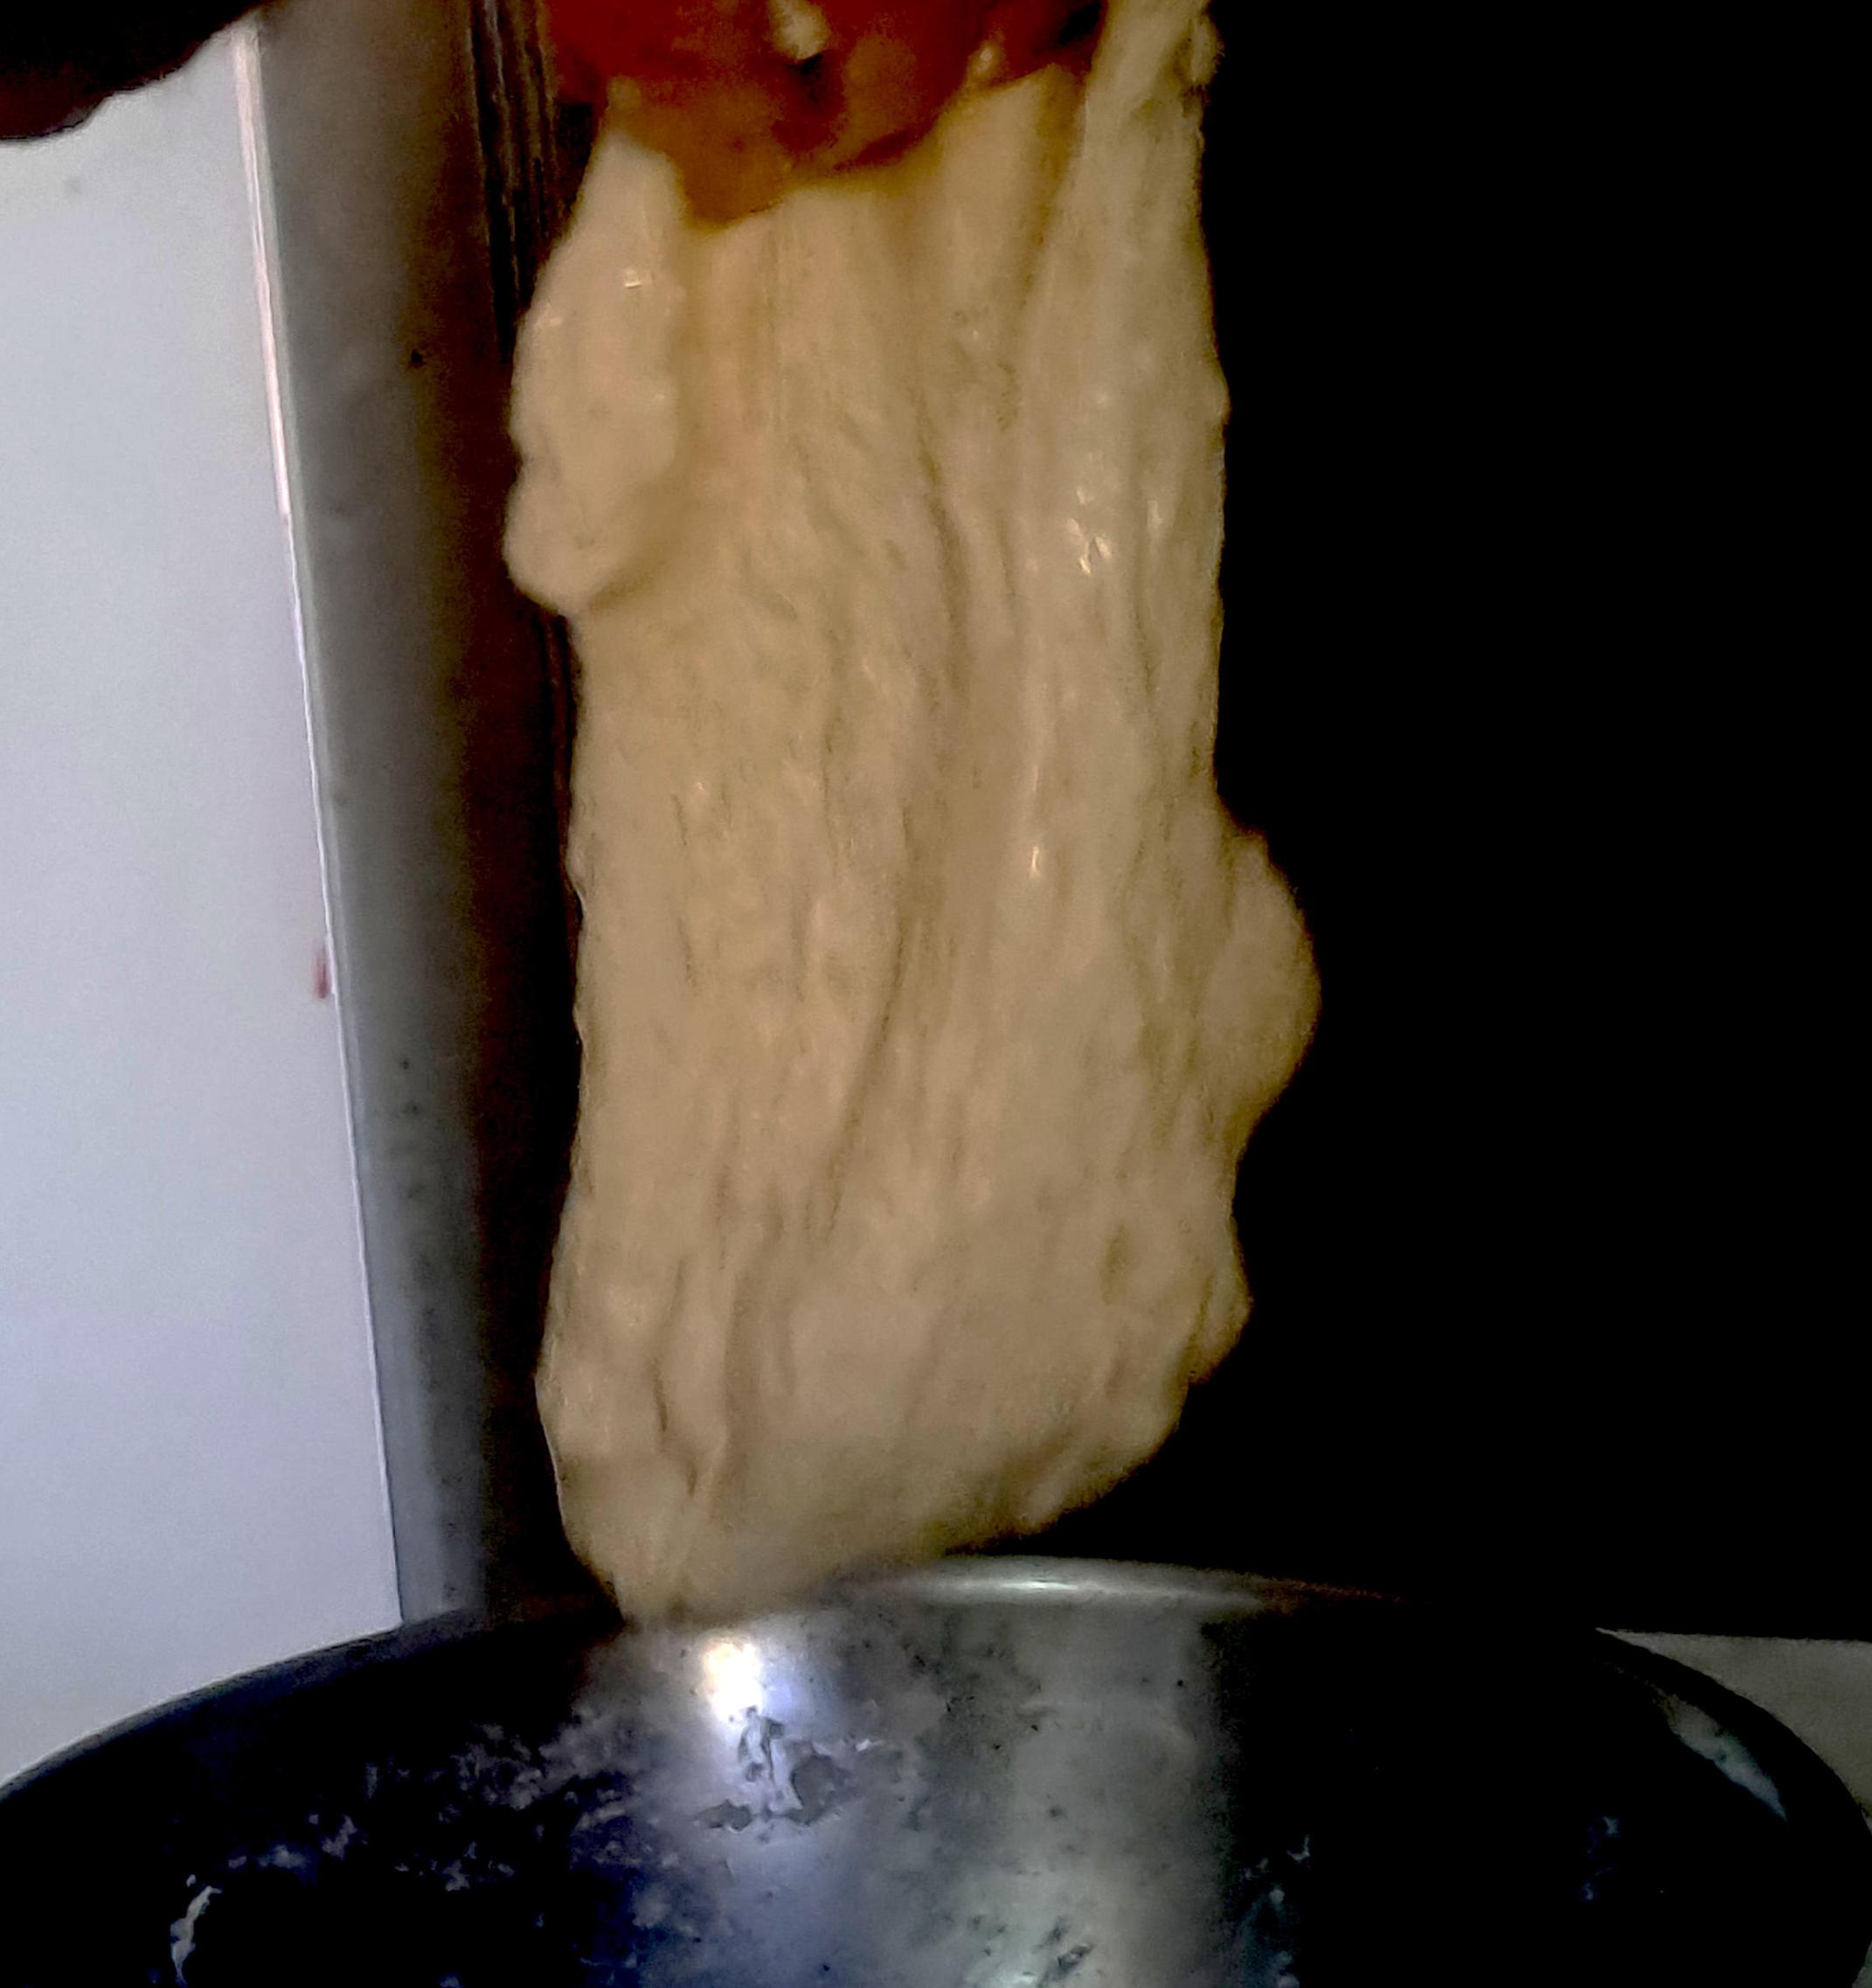
The dough wasn’t “stretchy”
The remaining Coil-Fold sessions were much the same except the dough grew softer as it warmed-up. It never became stretchy and I found I had to jiggle the dough while holding it by one end, instead of in the middle. Even during the forth session of Coil-Folds, when the warm dough was soft and sticky, I still found it necessary to let the dough stretch down by holding it by the end and shaking to force enough impetus for a 12-inch stretch.
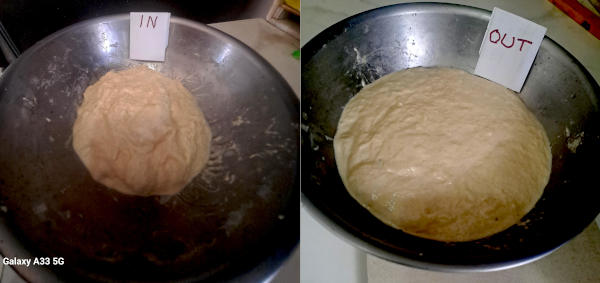
Comparison of dough, in and out of fridge
After 24-hours in the fridge, the dough looked like a bowl of potato soup but was surprisingly stiff and had risen.
I had to coax it out of the bowl with a spatula but it dropped onto the peel where I was able to shape it, tucking under to provide some surface tension. No signs of over proofing. The dough ball was too soft to score properly but held its shape while I got it into the oven. There was a reasonable oven spring though the score marks filled-in. I ended with a round loaf with a nice crust.
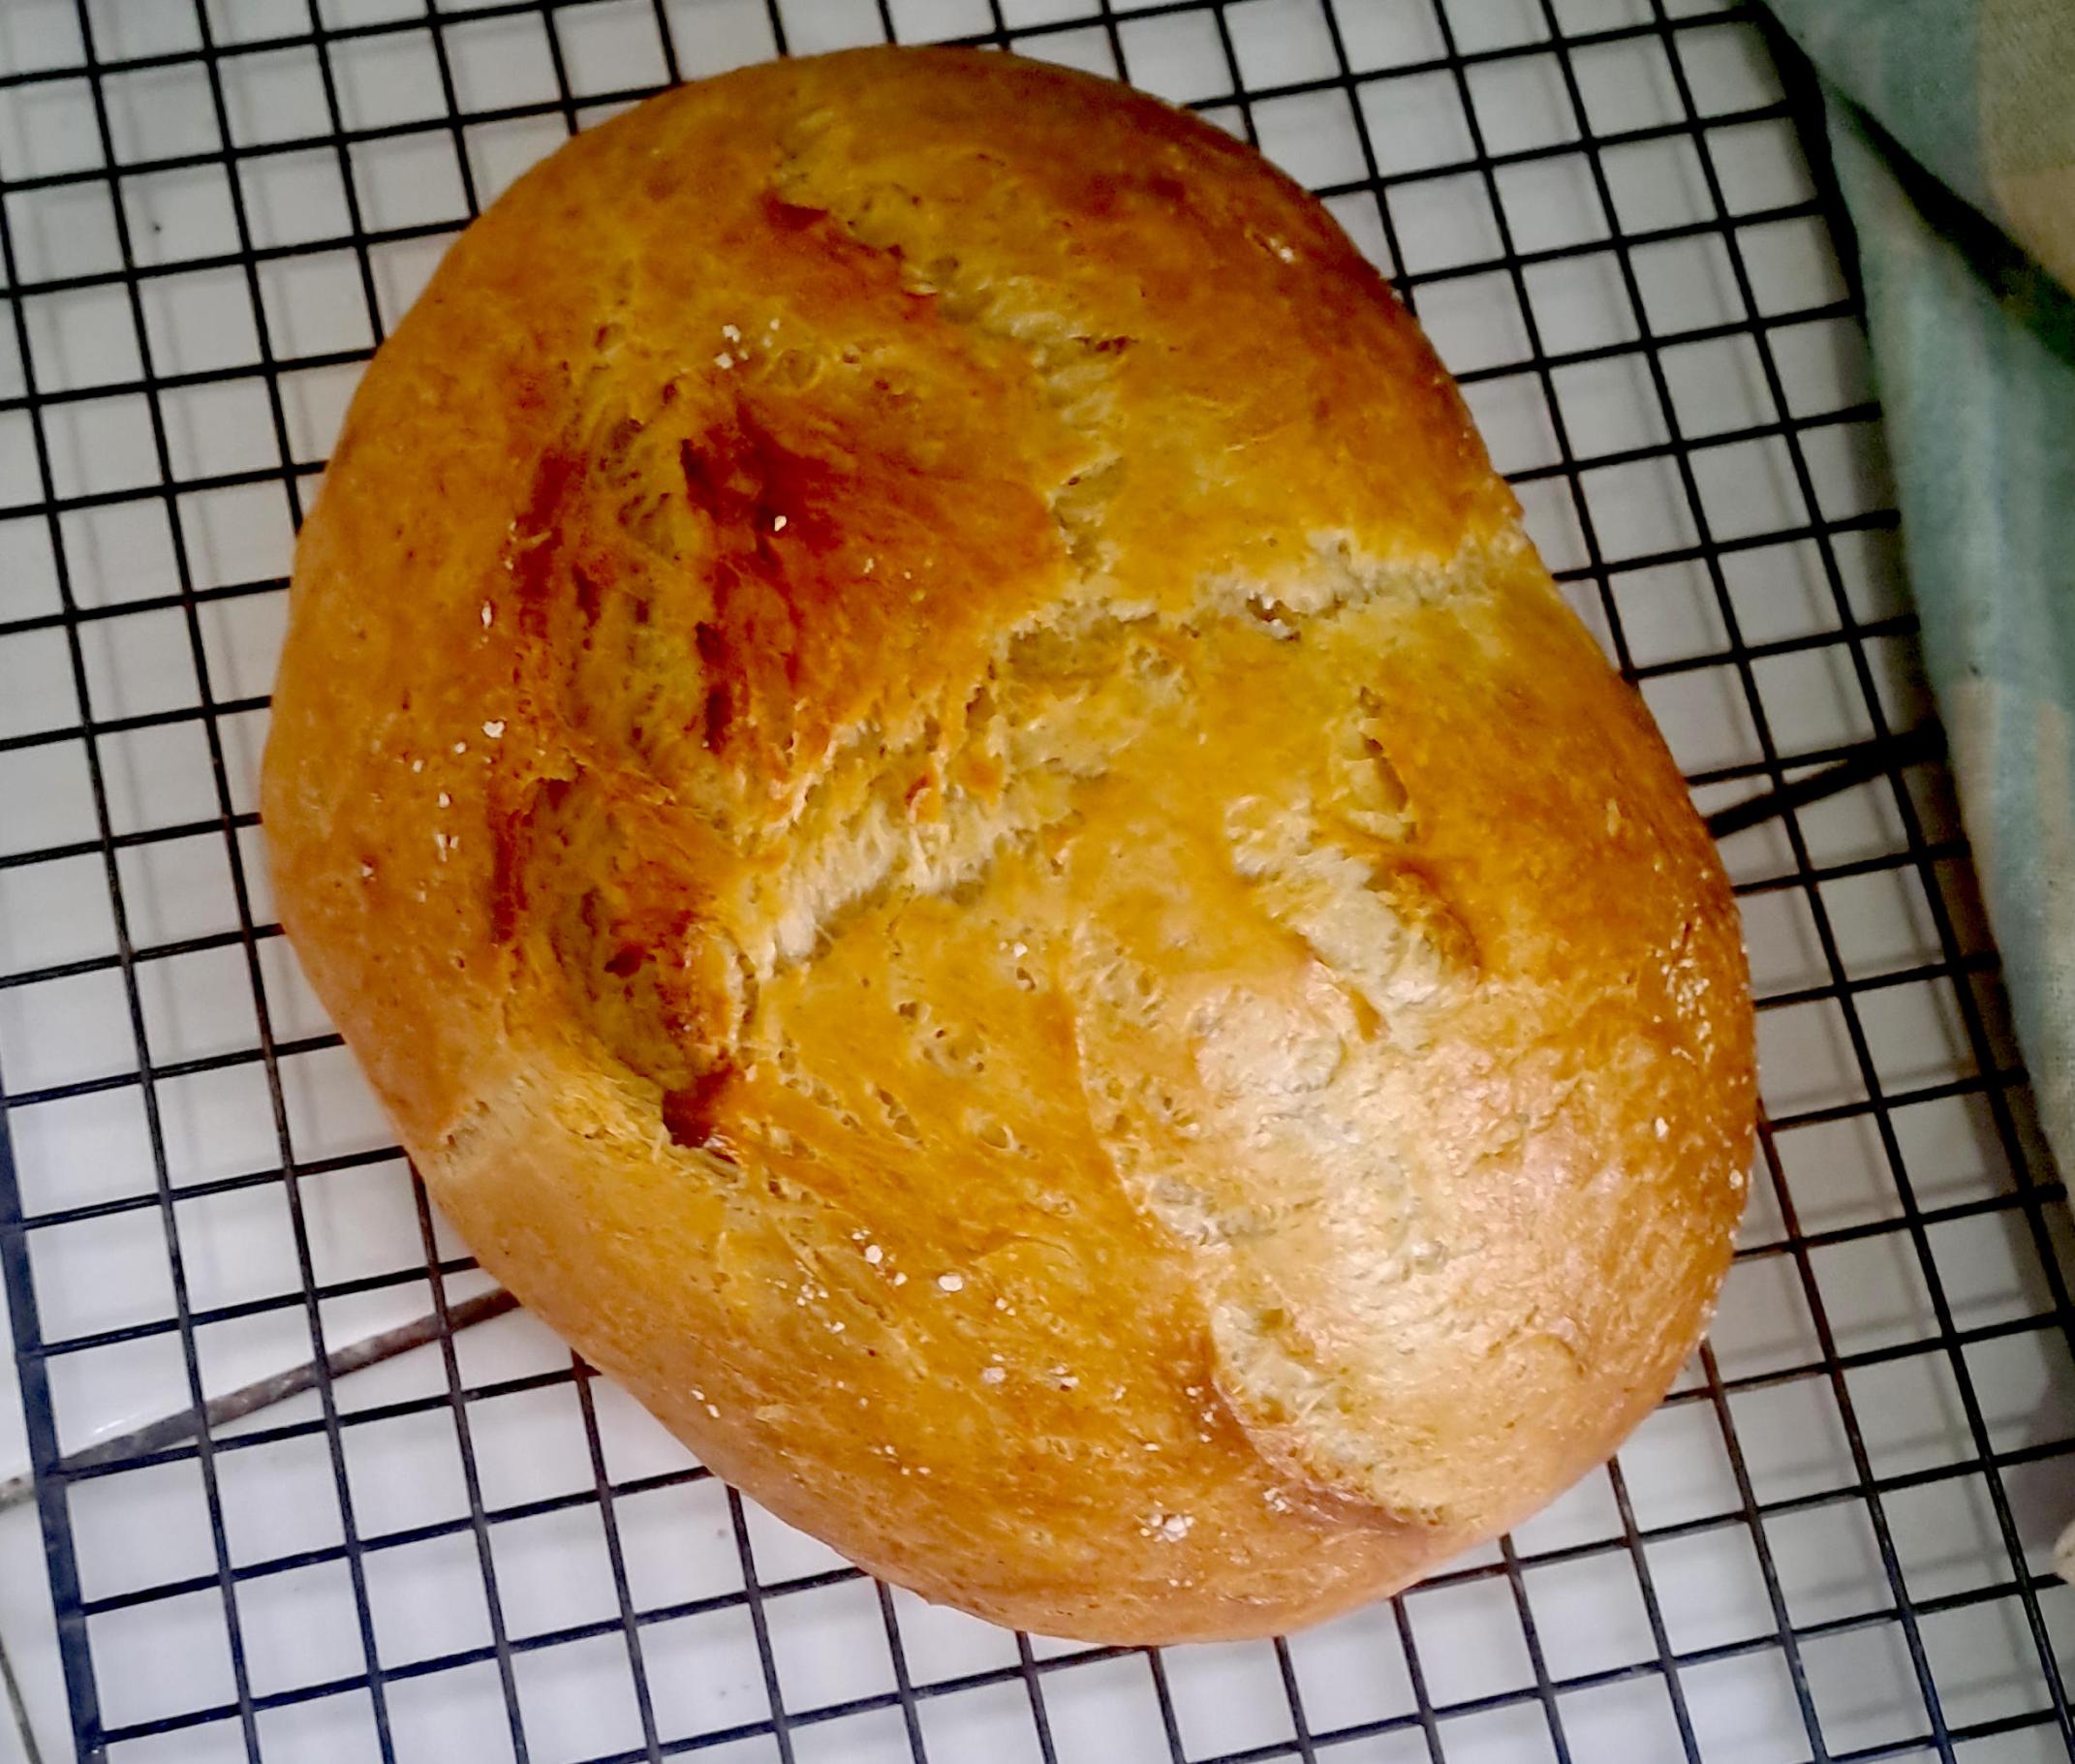
Crust
The crumb was chewy but again, not as airy as I was hoping for and there were some pockets of what seemed to be raw flour. Never had that before and not sure what caused it.
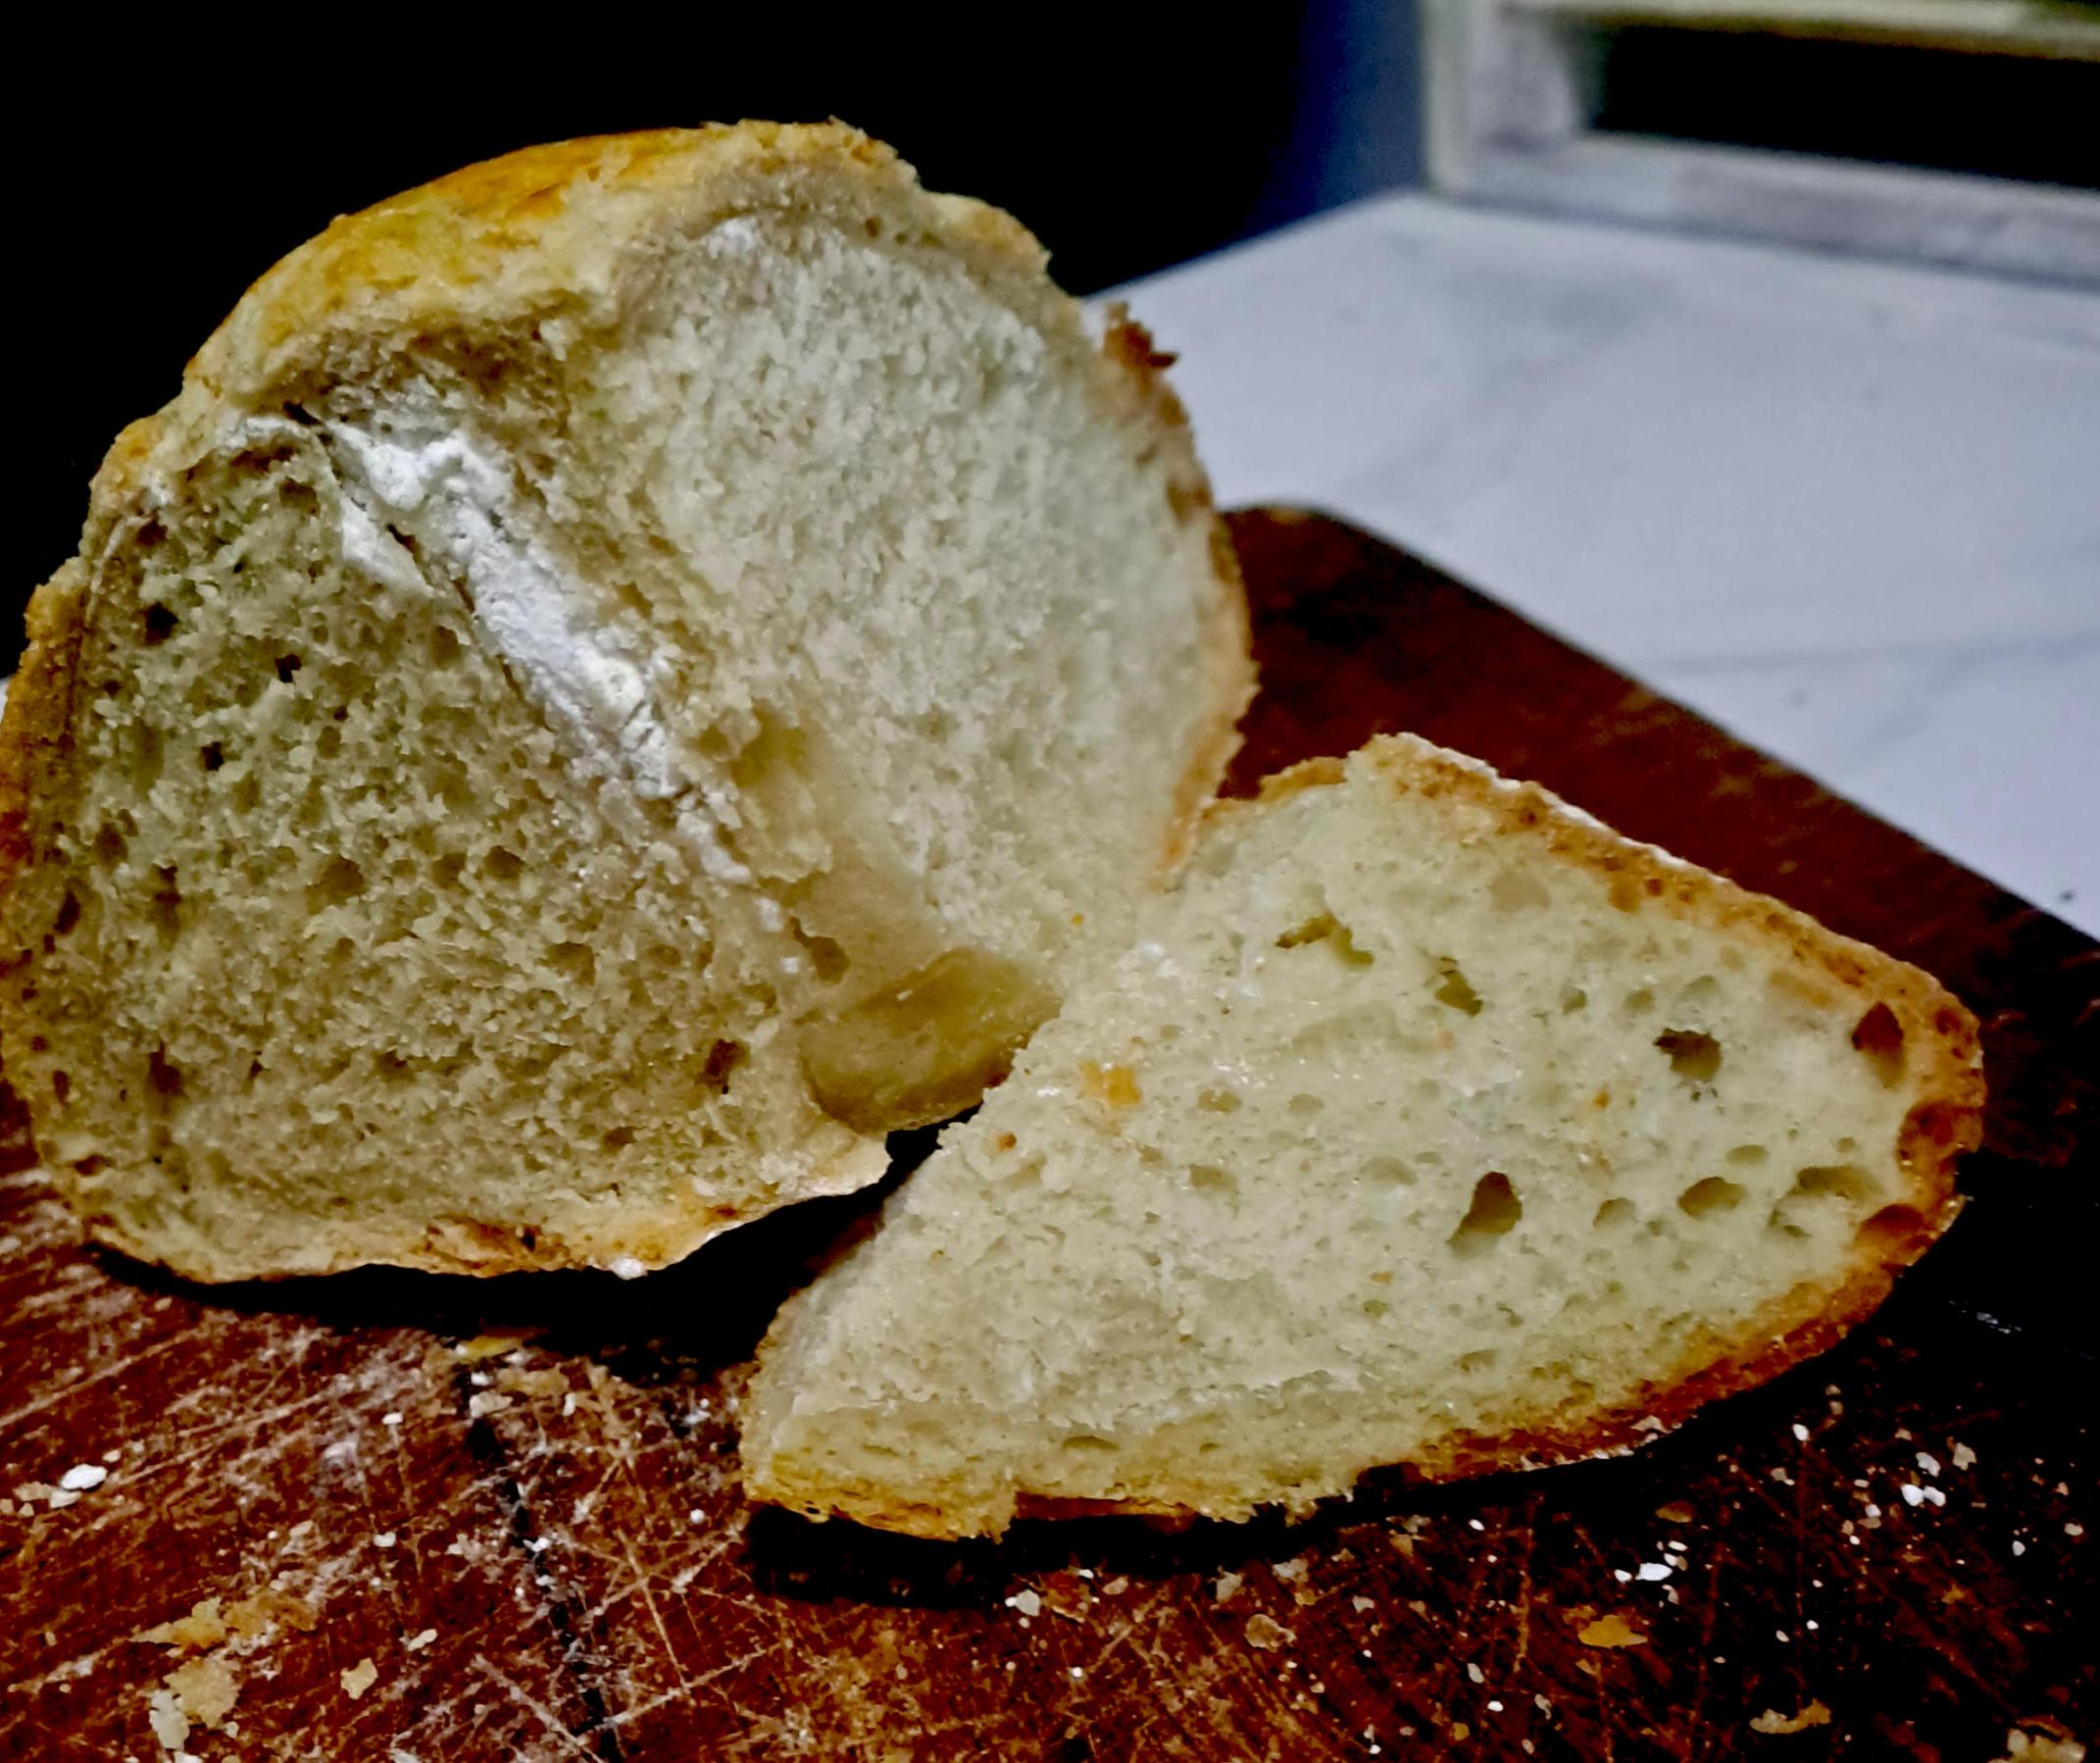
Crumb (showing white pocket of... flour?)
So with the over-proofing issue solved (I hope), now I’m looking for that airy crumb. More water? Scoring? Also the dough wasn’t stretchy which made the Coil-Folds difficult. Back to 20-min rests between Coil-Fold sessions? And were the pockets of raw flour due to improper mixing?
I gotta say I’m not a fan of all this folding, stretching and coiling. Not digging-in and kneading the dough takes away all the fun.
Katie
That's real progress, Katie, especially given the flour. You may never be able to get as airy a crumb as you would like; I think your picture shows a decent crumb anyway.
You could knead it more at the start, but you would have to pay attention to two things:
That white streak of flour looks like the dough was floured before shaping. If it was, see if you can use less flour. If the dough is just too sticky, maybe it can't be helped, but it might only be a matter of practice. You could try wetting your hands, just a little, before shaping instead of adding flour.
TomP
Thanks Tom... couldn’t do it without you and the others. And yes, I used lots of flour on the dough and the peel. I was very concerned about tucking and shaping and getting the sticky dough from the peel into the oven. I guess some of that flour got folded into the dough. No big deal.
I might go back to letting the dough rest for 20-min between Coil-Fold sessions to see if I can increase extensibility. The dough just didn’t want to stretch under its own weight. I’ll do some tweaking later this week.
Katie
Can you get some kind of parchment (aka baking) paper? I put it on top of the peel and slide the whole works, paper and loaf, into the oven. Otherwise, see if you can get some coarse flour or meal - corn meal, I'm sure, where you are. Sprinkle it on the peel instead of flour. It should release better.
About the dough not stretching under its own weight, that happens to me sometimes too, especially when I'm only making a single loaf which is most of the time. Shaking it like you are doing is fine. You can pull the dough as far as it will go and then fold it over on itself with a quick motion. This will help stretch the dough even if not as much as you were expecting. If the dough sticks to the bowl and doesn't want to come out, hold the bowl down with one hand and fold the upper part over the bottom with your other. Or take the dough completely out of the bowl and work it on the counter. I like to leave it in the bowl so I won't have to clean the counter each time I do a S&F session.
Parchment paper is iffy, Tom, but certainly corn meal is stocked locally. And it is quite a coarse grind. I’ll pick some up tomorrow and use it next time around.
I guess stretching the dough isn’t a major problem. But I see these bakers lifting the center of the dough and stretching it shoulder-high, so soft, so elegant. But you bring up a good point: my loaves are small, only 320 grams of flour so maybe there isn’t much weight to begin with. And maybe increasing the rest between sessions by five minutes will make a difference. Anyway I’m pleased and encouraged by this loaf.
Katie
Those bakers in videos, they've got much better flour than you. And the small size of yours (and mine) work against doing that.
Congratulations Katie! You are definitely getting closer to a good loaf with very challenging conditions.
I think good temperature control and fine tuning of hydration are the ways to go. I would fine tune hydration down rather than up, however. Until you have a dough that is just easy enough to handle without too much anxiety. IMHO, better to have a slightly firmer dough that you can ferment slightly longer at a lower temperature than a very slack one that is running away from you in terms of fermentation.
I would not add all the water for the bulk ferment at the same time but keep about 30ml back and add it a little at a time until you have a final dough that is just right in terms of structure and handling and then do your calculations and see how much of the water you used for the next time.
Also, until your intuition becomes more accurate, consider putting a tsp of the final dough in a small narrow transparent container with straight sides (think test tube, I use a small shot glass!) where you can mark on the side the start point of the dough, and keeping that in the fridge or where ever the bulk dough is, use it to see more precisely how much the dough has grown and how far the fermentation has progressed so you can bake it at the best point.
Just some ideas for getting to the next level now you have the basics in place.
I've been wondering how Katie would do with a no-knead type of bread, like Jim Lahey's. Mix everything together with a small amount of yeast and leave it overnight. Do you think this weak flour could stand up to that process? It would probably bubble up fine, but do you think it would rise a second time before baking? Due to the hydration problems with this flour, she'd have to cut back on the water in Lahey's recipe, but it might be worth a try. I'd love to give it a shot, but don't have any weak flour.
I don't think the flour will be able to hold up that long. Think of this flour as being low grade pastry flour and I don't think you'll be too far off. Of course, trying it out is the only way to be sure...
Try doing nothing - except for a few mixes - see what happens. I should add - don't think water makes a hole - it doesn't. Enjoy!
Thanks, Rene, it’s been a journey. Going over my recipes I find I have detailed notes on 39 loaves of bread. I started at 42% hydration and slowly, through varying techniques and tricks, I am now up to 65% and, while not perfect, the loaves generally got better with more hydration. And while this last batch of dough wasn’t easy to handle, it worked out better than the dough-slop before it. My crust is now much softer and the crumb chewy. But not airy.
I’ve always thought that if the crust opened up a bit it would allow the bubbles to expand in the crumb. I’ve been trying to score the dough at 45-degrees with an oiled razor but am now thinking of cutting straight down into the dough several times and then doing a series of Tuck&Roll-Under maneuvers to open the score marks. I dunno. It’s worth a try.
One other thing I’ve noticed, my kitchen isn’t filled with the fragrance of baking bread. And while some loaves taste better than others, I’ve never been excited by the flavor. So once I’ve done some more tweaking, I might experiment with a pre-ferment but I’m not there yet.
I like the idea of your shot glass holding a sample of dough. I’m a beer drinker myself but I’ve some pill bottles somewhere that might suffice. Oh man... Beer, bread and barbiturates. What would mother say!
Katie
Hey Moe... Who is Jim Lahey?
Jim Lahey created a "revolutionary" type of bread in his Sullivan St Bakery in NYC. He mixed together flour, water, salt and a bit of yeast, left it overnight to get bubbly, then shaped (as much as possible--it was wet), proofed and baked it in a hot Dutch oven. It came out crispy, holey and delicious. There's a NY Times/Mark Bittman video online, but many other sites have instructions. No kneading, no folding, no nothing. But, it depends on a strong gluten structure, so probably wouldn't work.
And how do you get a good gluten structure. Which is why it does work. Leaving too long is a problem of the baker. Enjoy!
And Davey... Do nothing? Could you expand on that please?
Simple - don't do anything. Except for a couple mixes. If a starter is capable that is - and the reason for not putting down time. The starter fits me - not the other way round. Enjoy!
Thanks Moe. Sounds a bit like what Davey is suggesting. I think, for now, I'll stick with what I got.
Katie
Congrats, first of all, Katie -- you have become a bread baker! Through 39 episodes of trial and error (and some consultation here), you have wrangled your unforgiving low-protein flour into a real loaf of bread. Hee wack! Honestly, this is an epic achievement. Beer, bread and barbiturates might be taking the celebration too far -- but, hell, everything in moderation.🤣🤣🤣
Also, the fact that you are annoyed by stretch & folds and want to knead is more proof: you're a bread baker.
a couple of other notes:
--your photo of the stretch looks reasonable. I've made plenty of breads that don't stretch more. A wetter dough will perhaps stretch more easily, but your flour may not be able to absorb more water without losing strength. You might try a tablespoon more H2O at a time to see where you can get it to.
--the low protein of your flour will probably make scoring a continual struggle, as the so-called gluten sheath -- the network of strands that makes the bread stay together -- will always be suspect.
--a biga-like preferment (45% hydration, not intended to develop gluten at all) could potentially help with flavor down the road. You could also try using cold beer instead of cold water to hydrate the dough and see what that does.
--also, what temp are you baking at?
Rob
PS: how's Bolo?
I would echo Rob's idea to give a try to using a biga preferment. Lin and I have used the technique to good effect, particularly with weak flours. If you do a search for 'shaggy' or 'crumble' biga, our posts should come up.
The idea is that you dissolve your yeast (1% in weight of the flour you use for the biga) in water (45% of the wight of flour you will use in the biga) and then mix in the flour with the water very gently to create a something looking like the crumbs for an apple crumble topping. I use a chopstick to just mix very slightly the flour and yeast and water together and then my fingers to break up any larger pieces rubbing them together with the flour. You then cover the 'crumble' (I use a fairly flat and wide tupperware type of container) and leave it for up to 24h. In a warm climate, I might be tempted to also put it in the fridge or at least the coolest place I can find, or reduce the fermentation time. You then mix this into the remaining flour and water etc to make your final dough. I usually use 50% of the total flour for the loaf in the biga.
Using this technique, I have managed to make super nice and lofty freestanding loaves with spelt flour when with all other techniques I was getting a puddle rather than a loaf, very much like the loaves you have described and provided pictures of. I am pretty sure it would also work for weak wheat flour like yours, plus it does not suffer as much from the heat in a hot place. Also, the final fermentation is quick so the gluten has less time to degrade. In addition, because in the biga itself there is minimum gluten formation, the fermentation takes place without the gluten being in place, so there is much more of it available for the bulk ferment.
Thanks for this Rene and your biga is certainly something I want to try. Are you suggesting this somehow dovetails with the 24-hour cold fermentation I am currently using to bring structure to the dough? ...So I would make the biga as you describe, use it to make the dough and then go through the stretching and coiling exercise before cold fermenting for 24-hours?
As I mentioned in an earlier post, I was under the impression that a preferment was all about adding flavor. If it can add structure as well, I’m all in!
I’m planning a loaf for this weekend and I think I’ll try to squeeze in another 5-grams of water and see if I can get some openness in the crumb. Might end up with a cow-pie but I’ll shovel whatever I get into the oven and hope for the best.
Katie
I would do exactly what you did with your last loaf, but preferment half the quantity of the flour you used. Then you just subtract from the quantity of total flour and total water the amounts you use to make the biga and mix in the biga in with the remaining ingredients once it is ready to make the final dough and proceed as you did previously. Remember, for the biga you need 45% water and 1% yeast. So, for example, if you use 100g of flour for the biga, you would mix this flour with 45g of water and 1g of yeast. I use half my total flour for the loaf in my biga.
My guess is you may not need to do your final ferment for the full 24h you have done last time. That's why I suggested the little measurement glass before, so you can bake it as soon as it doubles and shape a little before that, rather than go by the clock. Remember, if you put the bulk ferment in the fridge, also put the small calibration glass in the fridge to. It must be under the same conditions as the bulk ferment all the time so that it mirrors the bulk dough's fermentation.
Okay Rene, but I’m going to stay the course for the next loaf. I want to see if I can reach 67% hydration. That will determine how much water I can use for a biga experiment. I’ll run my method past you next week. And again, many thanks for this.
Katie
Hey Rob, good to have you onboard and thank you for the kind words.
I’ve probably just about met my hydration limit with this flour. It’s not what I set out to bake but the results have, for the most part, steadily improved.
This whole thing started on a trip to Sosua where I bought a Pan Rustico boule at a German store. The crust was crispy and the crumb moist, brown and flavorful. I lived on wine, cheese and bread for days. And that’s what I wanted to reproduce in my own kitchen. Oh well...
I’m getting a nice chewy crust that I can actually cut with a bread knife. And I’m beginning to see the hint of an open crumb. I’ll try an additional 5-grams of water next time just to see if the flour can handle it and go back to a 20-minute rest between Coil-Fold sessions to see if that improves the “stretch.” At Tom’s suggestion, I bought a small bag of coarse corn meal to dust my peel (a piece of ceramic floor tile). I have a 12-inch cast iron skillet and bake the bread covered with a heavy aluminum bowl for a “dutch oven” effect. The oven is pre-heated to 500F for 45-minutes. The dough is slid into the skillet with a couple of ice cubes, covered and baked at 480F for 20-minutes, then uncovered for 20-minutes more. I’ve wondered about reducing the heat for better oven spring but haven’t experimented yet.
And Bolo seems fine, thank you. It’s hard to tell being he sleeps all day. We go for our walk in the evening until he gets distracted. He runs off to mess with a chicken, stare down a cat, or disappears between the houses and I won’t hear from him until the next morning. There’s a double knock at my gate (he’s learned if he quickly butts it twice it will unlock), and he comes upstairs, wags what’s left of his tail then goes to his sunny spot in the corner. Weird dog.
Okay. Planning another loaf, probably for the weekend. A few more tweaks and I’ll be ready to experiment with a pre-ferment. Such a glutton for punishment :-)
Katie
When next you're in Sosua, you gotta ask that bakery where they get their flour -- or buy some from them. Wine, cheese and bread on the beach sounds idyllic. And it is, of course, what much of humanity lived on for millennia (cheese essentially being a storage device so milk won't go bad without refrigeration).
At 480F, I'm surprised you're not getting more scorch on your loaf. I generally bake my ryes at 450F, 20 minutes covered, 25 minutes uncovered, and they're nicely browned and sometimes a tiny bit burnt after that. Are you also preheating the skillet and the bowl?
As for Bolo, he's not weird. He just knows what's safe and good for him. And he's so motivated to join you in your house that he's figured out how to open the gate! Fantastic.
Have fun with the next bake!
R
Unfortunately, Rob, it isn’t a bakery but a small grocery store. They must get the bread delivered in the wee-hours each morning, perhaps from the City of Santiago. The store opens at eight and if you’re not there by nine, the shelves are empty. I can only think the bakery has sacks of flour shipped in.
And yes, the skillet and cover are preheated to 500F. If I could get a good “ear” with my scoring, I’m sure it would scorch. Some of my earlier loaves were left uncovered longer to brown them but I thought it might be causing the uncutable crust so I stopped.
And not only the gate, that ugly mutt figured out how to open my damned heart.
Katie
Here is the result of my current loaf. The recipe and method remained the same except for the addition of 5-grams of water for a hydration of 67% and the use of corn meal on the peel. With the extra water the dough was softer and the stretching, folding and curling was a bit easier. The dough was harder to work coming off the 24-hour cold fermentation but manageable. No sign of over-proofing. One thing I noticed, using Rene’s shot glass to measure the rise, I didn’t reach 2X volume but fell short by 25%. Considering the problem I have with over-proofing, should I add more yeast or go back to a short fermentation at room temperature? Which is safer?
Scoring was done, two cuts straight down into the dough, instead of angled and I fared much better. The profile of the loaf was squat as compared with the last 65% hydration loaf but there was more openness present in the crumb. I didn’t get the oven spring like last time.
I won’t bore you with a bunch of photos but this will give you an idea of the result:
Crust
Crumb
Comparison with my last loaf. 65% hydration on the left, 67% on the right.
Okay, I’m open for comments before I move onto a biga and I thank everyone for the help.
Katie
You are definitely making bread, real bread. Scoring lengthwise promotes sideways spreading in loaves like this and, I think, contributed to the final shape being a bit flatter.
With your flour, I would favor more leavening agent and a shorter fermentation time, because the flour seems to have trouble keeping its strength over time.
I'll be interested to how using a crumbled biga works out.
TomP
Thanks Tom...
What really excites me with this loaf is the open crumble. Such an improvement. And maybe go back to a chris-cross, straight down score, across the loaf? The corn meal is very coarse which makes it harder to “dust” the peel, but worked well. The biga will be interesting fer-sure. I’m looking forward to trying the technique later this week.
Katie
Agree with Tom. Less time, more yeast and horizontal rather than vertical scoring.
Don't be tempted to increase the temperature either. The temperature control seems to have been the key to your breakthrough.
Well done for the improving bakes. Every one is a learning opportunity.
On hydration I think you are close to the limit, unless you want to make a ciabatta type of bread.
Thanks Rene. And yes I agree. I have maxed out at 67% hydration. So now that I have my numbers, and thinking about this all afternoon, this is what I’m proposing. And please correct me where I am wrong.
My recipe is 320-grams of flour, 215-grams of water, 1-tsp sea salt, 1/4-tsp active yeast.
For the biga:
Halve the quantity of flour—
320 / 2 = 160-grams of flour
Hydrate flour to 45%—
45 / 100 x 160 = 72-grams of water
Yeast—
1% of 160 = 1.6 grams of yeast. One tsp of yeast weighs 1.17 grams. So 1/4 tsp is a little light. Maybe going up to 1/2 tsp of yeast would help the rise without over proofing. (No yeast added to the final dough?)
No salt in biga. Add to final dough.
Dissolve yeast in 72-grams of water and add to 160-grams of flour. Shake biga ingredients in a tuperware and then roughly stir with a chopstick until it looks like apple crumble. Don’t overwork the biga.
Ferment biga in fridge for 24-hours?
Place biga in mixing bowl, add salt to the remaining cold water (143-grams), mix with biga, add remaining cold flour (160-grams), mix and let hydrate as per my usual recipe. Continue with the stretching, folding and coiling then place in fridge for the 24-hour cold fermentation.
Does all this sound anywhere close to right?
Much thanks... Katie
Yes. Spot on!
Just a couple of small things.
Add the remaining water for the bulk to the biga a little at a time so that it is easier to mix up or do like Lin does and let the biga crumbs soak in the water for about half an hour before you mix it up.
Keep and eye on your small calibration jar and bake the final loaf when it's close to double. With the extra yeast and the biga or might ferment faster than before and you don't need the full 24h.
So you know what you are looking for with the biga, when you open the container with it in it, it should smell like over ripe fruit and the crumbs should be a little puffy and shiny and light colour.
Keeping fingers crossed and looking forward to hear how it goes!
So you think I’m okay with 1/4-teaspoon of active yeast...
I’m going to start a new thread. See “Katie’s Biga Boogie” with a few photos. Thanks everyone...
Katie